我的设置:
1 个控制器节点 + 2 个计算节点
RDO Havana 2013.2.2,
CentOS 6.5, OpenVSwitch 1.11.0
VXLAN 本地 IP:
控制器:10.142.255.101
计算-1:10.142.255.102
计算-2:10.142.255.103
1. 使用 ML2 设置 VXLAN
打包安装后,默认情况下不安装ML2,我们必须手动配置它。
在控制器节点上:
yum install openstack-neutron-ml2 python-pyudev
编辑/etc/neutron/neutron.conf
core_plugin =neutron.plugins.ml2.plugin.Ml2Plugin
service_plugins=neutron.services.l3_router.l3_router_plugin.L3RouterPlugin,neutron.services.loadbalancer.plugin.LoadBalancerPlugin
更改链接plugin.ini
unlink /etc/neutron/plugin.ini
ln -s /etc/neutron/plugins/ml2/ml2_conf.ini /etc/neutron/plugin.ini
编辑/etc/neutron/plugin.ini
[ml2]
type_drivers = vxlan
tenant_network_types = vxlan
mechanism_drivers = openvswitch
[ml2_type_flat]
[ml2_type_vlan]
[ml2_type_gre]
[ml2_type_vxlan]
vni_ranges = 1001:2000
vxlan_group = 239.1.1.1
[database]
sql_connection = mysql://neutron:83105f1d6ded47cc@10.142.0.101/neutron_ml2
[securitygroup]
firewall_driver = dummy_value_to_enable_security_groups_in_server
在每个节点上编辑/etc/neutron/plugins/openvswitch/ovs_neutron_plugin.ini
[OVS]
vxlan_udp_port=4789
tunnel_type=vxlan
tunnel_id_ranges=1001:2000
tenant_network_type=vxlan
local_ip=10.142.255.101      #Use 102 for compute-1, 103 for compute-2
enable_tunneling=True
[AGENT]
tunnel_types = vxlan
polling_interval=2
[SECURITYGROUP]
firewall_driver=neutron.agent.linux.iptables_firewall.OVSHybridIptablesFirewallDriver
数据库创建:
mysql -e “drop database if exists neutron_ml2;”
mysql -e “create database neutron_ml2 character set utf8;”
mysql -e “grant all on neutron_ml2.* to ‘neutron’@’%’;”
neutron-db-manage –config-file /usr/share/neutron/neutron-dist.conf \
–config-file /etc/neutron/neutron.conf –config-file /etc/neutron/plugin.ini \
upgrade head
重新启动中子服务
service neutron-server restart
service neutron-openvswitch-agent restart    #On every node
检查控制器上是否建立了隧道:
[root@controller ~]# ovs-vsctl show
…
Bridge br-tun
Port patch-int
Interface patch-int
type: patch
options: {peer=patch-tun}
Port br-tun
Interface br-tun
type: internal
Port “vxlan-10.142.255.103”
Interface “vxlan-10.142.255.103″
type: vxlan
options: {in_key=flow, local_ip=”10.142.255.101″, out_key=flow, remote_ip=”10.142.255.103”}
<span style="color:#ff0000;">Port “vxlan-10.142.255.102”</span>
Interface “vxlan-10.142.255.102″
type: vxlan
options: {in_key=flow, local_ip=”10.142.255.101″, out_key=flow, remote_ip=”10.142.255.102”}
…
我们看到在控制器到计算 1 和计算 2 之间创建了 2 个隧道。
检查是否在计算上建立了隧道(例如 compute-1):
[root@compute ~]# ovs-vsctl show
…
Bridge br-tun
Port “vxlan-10.142.255.103”
Interface “vxlan-10.142.255.103″
type: vxlan
options: {in_key=flow, local_ip=”10.142.255.102″, out_key=flow, remote_ip=”10.142.255.103”}
Port “vxlan-10.142.255.101”
Interface “vxlan-10.142.255.101″
type: vxlan
options: {in_key=flow, local_ip=”10.142.255.102″, out_key=flow, remote_ip=”10.142.255.101”}
…
在 compute-1 和 controller 以及 compute-2 之间创建了相同的 2 条隧道。
尝试启动一些 VM 实例,以测试 VM 流量如何通过 VXLAN 隧道。
nova boot –flavor 1 –image cirros –num-instances 2 –nic net-id=<net-uuid> vm
每个计算节点应采用一个 VM:
[root@controller ~]# nova list –fields name,status,power_state,host,networks
+————————————–+—————————————–+——–+————-+———-+———————+
| ID | Name | Status | Power State | Host | Networks |
+————————————–+—————————————–+——–+————-+———-+———————+
| 2bc01296-f8d4-48ce-a600-5acf83ee2bbf | vm-2bc01296-f8d4-48ce-a600-5acf83ee2bbf | ACTIVE | Running | compute2 | testnet=192.168.1.2 |
| 4f63feaf-e92a-4045-8e45-d3160c99fb84 | vm-4f63feaf-e92a-4045-8e45-d3160c99fb84 | ACTIVE | Running | compute | testnet=192.168.1.4 |
+————————————–+—————————————–+——–+————-+———-+———————+
2. 单播虚拟机流量数据包
将 ICMP 数据包从控制器(L3 代理路由器命名空间)发送到 VM。捕获数据包以查看 VXLAN 数据包。
[root@controller ~]# ip netns exec qrouter-28f6fe53-1f94-4355-81e3-85a2aad7b665 ping -c 1192.168.1.4
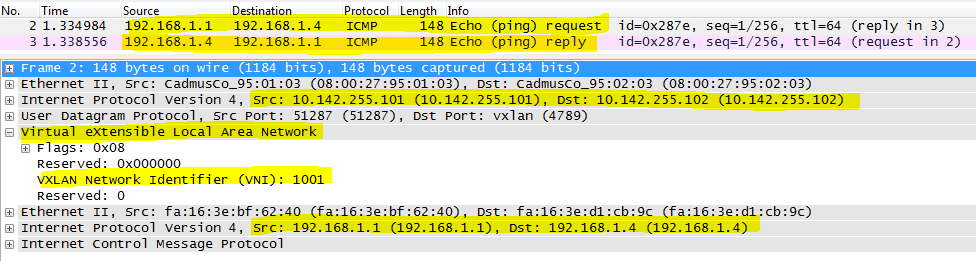
We can see the Outer IP header + VXLAN header with VNI 1000, then it’s Inner IP header plus ICMP payload. We can see the VXLAN packet is unicast between controller local IP 10.142.255.101 to compute-1 local IP 10.142.255.102
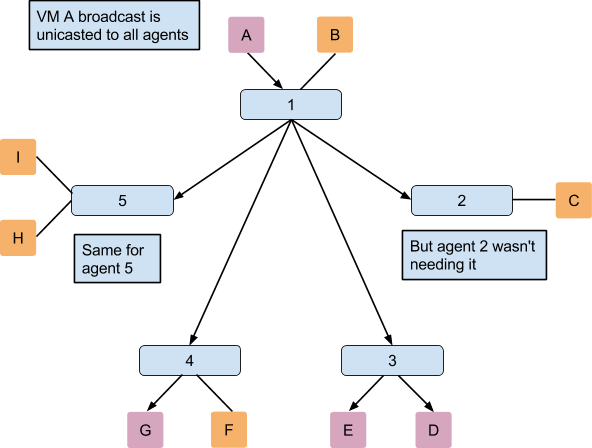
3. Broadcast or Multicase packet of VM traffic
Neutron and OpenvSwitch handle VM broadcast and multicast in the same way, here takes broadcast as example.
Send one ARP request broadcast packet from controller (L3 agent router namespace) to the VM network. Capture the packet to see the VXLAN packet.
[root@controller ~]# ip netns exec qrouter-28f6fe53-1f94-4355-81e3-85a2aad7b665 arping -c 1 -I qr-f3d1a9ea-9a 192.168.1.4


We can see the broadcast is actually sent as 2 unicast packets from controller to compute-1 and compute-2. Then compute-1 holding the VM with IP 192.168.1.4 replies the ARP request.
The picture from official Openstack documentation explains this situation:
这种数据包泛洪显然并不理想,尤其是在大规模部署中。但是,Openstack支持更好的机制来处理这个问题。请参阅以下各章。
4. VXLAN 在 VTEP 之间使用多播来传输虚拟机广播/组播流量
根据 VXLAN 规范草案,第 4.2 章:
http://tools.ietf.org/html/draft-mahalingam-dutt-dcops-vxlan-08#page-9
如果虚拟机流量类型为广播或多播,则 VXLAN VTEP 使用多播在它们之间发送。
Linux桥支持这种工作方式。
但是,OpenvSwitch不支持这种方式,正如我在上一章中看到的那样,它在VTP之间使用多个单播。
请参阅OpenvSwitch Q&A:
http://git.openvswitch.org/cgi-bin/gitweb.cgi?p=openvswitch;a=blob_plain;f=FAQ;hb=HEAD
问:开放式 vSwitch 目前支持多少 VXLAN 协议?
答:Open vSwitch 目前支持网络上数据包的
成帧格式。目前不支持 VXLAN 的多播方面。
为了解决缺乏多播支持的问题,可以手动或从
控制器
预先设置 MAC 到 IP 地址的映射。
因此,中的配置仅适用于 Linux 桥接机制驱动程序。vxlan_group = <a multicast ip, e.g 239.1.1.1>/etc/neutron/plugins/ml2/ml2_conf.ini
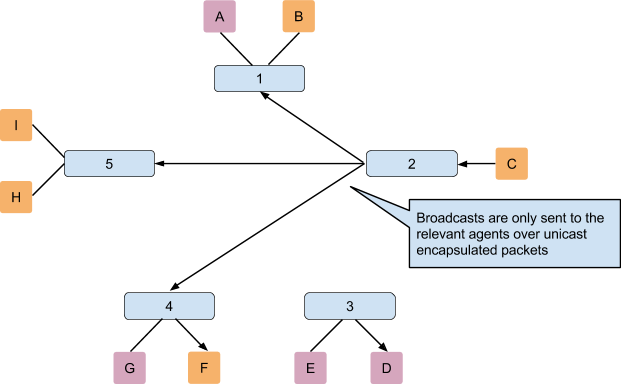
5. ML2 L2群体机制驱动因素
从上面的虚拟机广播/组播流量处理场景中,我们知道有许多无用的广播仿真(单播)数据包在 VTEP 周围飞行。引入L2种群来解决洪水问题。
当使用带有隧道的ML2插件并且新端口启动时,ML2会发送一个update_port_postcommit通知,该通知由l2pop机制驱动程序拾取和处理。然后,l2 pop收集端口的IP和MAC,以及调度端口的主机;然后,它会向所有第 2 层代理发送 RPC 通知。
所以每个代理都可以学习MAC-IP-VTEP映射,当广播数据包来自VM时,VTEP只将其发送到相关的VTEP,不需要组播仿真。
这张图片解释了:
让我们来看看它是如何工作的。
在控制器节点上的 /etc/neutron/plugins/ml2/ml2_conf.ini 的机制驱动程序列表中添加 l2population。
[ml2]
mechanism_drivers = openvswitch,<span style="color:#ff0000;">l2population</span>
在每个 openvswitch 代理节点上启用 l2population,在 /etc/neutron/plugins/openvswitch/ovs_neutron_plugin.ini
[AGENT]
l2_population = True
重新启动控制器和计算节点上的所有中子服务器和 openvswitch 代理服务。
service neutron-server restart    #on controller
service neutron-openvswitch-agent restart   #on all nodes
现在L2人口应该开始工作了。
...将继续进行详细的数据包级别分析...


Comments
Post a Comment